

Port forwarding is the last necessary step if you want your server to be accessible from the internet. Good news is that it is not that hard. Bad news is that I am unable to provide a universal guide. Each manufacturer has a different front-end for router configuration. Netgear, LinkSys etc. they all do it in a different way. Do not worry though as the topic is not that complicated.
Static IP
Before you begin make sure that your Raspberry has a static IP address or is assigned the same IP every time it connects to your network. Port forwarding assumes that the IP address of your server on your local network does not change!
Find out the local address of your Raspberry here.
Static IP tutorial is in the works.
Find out the make and model
First of all you need to find the make and model of your router so that you know what instructions to look for. It is always somewhere on your router, usually in a form of a sticker with a serial number, place of manufacturing etc. This is the most important piece of information you need.
Check if configuration information is on the router
Some manufacturers include instructions on how to get to configuration page right there on the router. Usually next to the sticker with make and model at the bottom. Look for a local IP address. It will be in a form of 192.168.xxx.xxx. In addition to the address you should be able to find a login and a password for the admin configuration page.
Looking for information online
If the required information is not on your router you might have to resort to online search. Your first stop should be portforward.com. They have a massive library of instructions divided by make and model. You will find a detailed step-by-step guide for both common and uncommon models alike. Do not be alarmed if your exact model is not there and check out a sister model instead. Manufacturers often do not change configuration panel between similar models and you might find that AB-1100, which is not listed, can be configured using instructions for AB-1000. Passwords and login information will, most likely, be the same as well.
You can also search for the information simply typing something along those lines in your search engine
netgear wnr2000 port forwardEither way you should end up having the following information
- Router configuration address page
- Router admin user
- Password for admin user
CAUTION some modern routers require only password to log in. It is implied that there is only one user who is supposed to make changes. There is really no need to have any extra users, so it only asks for password. Devices that your ISP is giving you when you sign up for the internet usually work this way. Just the password.
Logging into your router
This one is simple. Just type the IP address you have found into your web browser – this will take you to configuration page. Bear in mind that the device you are using to log in HAS to be connected to the router. You cannot just use 4G from your phone to connect to your router.
Once the page loads just put the username and password.
CAUTION configuration panel allows you to make more changes than just port forwarding. Do not change any settings unless you are a 100% sure that you need to change them. It is tempting to change stuff and see what it does, but just do not. Stick to what you know.
Finding port forwarding section in the configuration panel
Once logged look for a tab/section called port forwarding. It can be a standalone section or can be a subsection of Security, Advanced settings or something else. Click through the panel to find it, unless you make and save changes rummaging around is harmless.
Actual port forwarding
Now that you have found the correct settings page you can finally begin to make changes.
You should see a page with a table describing rules that are in place. If there are none, the table will be empty. But it will look something along those lines
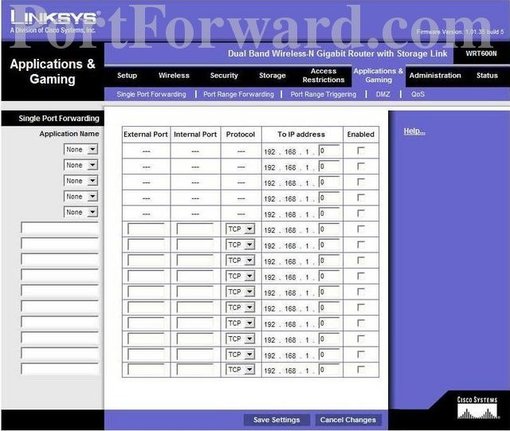
In order to forward any traffic to your server you will have to forward a port utilizing that traffic to your Raspberry. You might need to click on Add rule or a similar button, if you cannot put the information directly into the table.
The easiest way to show you will be on an example. Put the following information into the table in order to direct http (website) traffic to your server
- External port – 80
- Internal port – 80
- Protocol – Both
- IP address – local IP address of your Raspberry Pi
- Enabled – tick the box / select Yes (model dependent)
Bear in mind that you will have to forward ALL ports that your services use. If you want to be able to SSH outside of your network then you need to forward port 22 to your server, for outgoing mail – port 465 etc.
If you have Apache server installed and your RPi is running, try putting your external IP in the browser. It should show the website that Apache is serving from your RPi!
Conclusion
As you can see, port forwarding is not difficult, you just need some basic information and the knowledge of which ports need to be open. I will include the list of ports that will need to be forwarded in each service tutorial instead of dumping a long list here. Why open ports to services you do not actually use?