
At launch RaspberryPi 4 lacked a very useful feature – USB boot. That, however, has changed and we are no longer required to use an SD card. Well, almost, you still need one to upgrade your Pi to get the feature in the first place.
How to check if your RaspberryPi can boot from USB?
If you are updating your Pi often enough there is a good chance that you can boot form USB already. In order to check that, run the following command
vcgencmd bootloader_versionAnd compare your output with the following
Sep  3 2020 13:11:43
version c305221a6d7e532693cc7ff57fddfc8649def167 (release)
timestamp 1599135103
If your system has the same or newer version of bootloader then you can already boot from USB.
How to update your RaspberryPi to enable USB boot?
If your system is older, just run the following and give it time to update
sudo apt update && sudo apt upgrade -yOnce you reboot your RaspberryPi, you are all set. The feature has been implemented with the update.
If you do not want to update the whole system, just the bootloader itself, you can use the following command
sudo rpi-eeprom-update -aHowever, it is best to just update everything. Updating just the bootloader should be done only if you have software that is version dependant on other packages.
How does USB boot actually work?
Currently, by default, RaspberryPi will always try to boot from SD card first, even if boot from USB has been enabled. Only when there is no bootable OS on the SD card, RaspberryPi will look for OS to boot on USB device.
It can be summarised like so
- Check SD card for bootable OS
- If found, then boot OS
- Not found, then check USB drives
- If found, then boot OS
In order to boot from USB, remember to remove the SD card with your current OS from the RaspberryPi SD card slot.
Enabling USB boot after the update
In order to make use of the feature you have to enable it in raspi-config, run the following
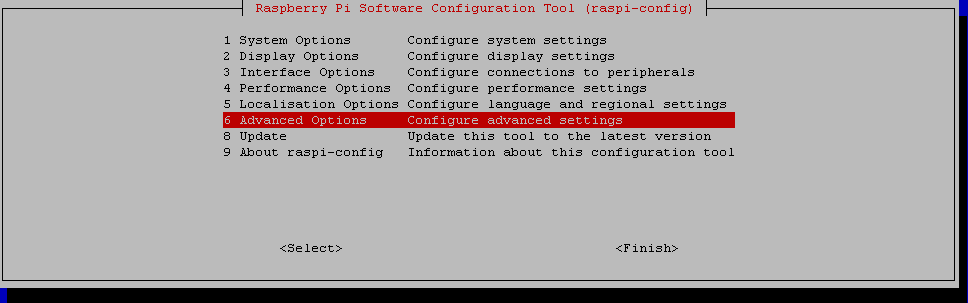
sudo raspi-configIn the main menu navigate to “6 Advanced Options”
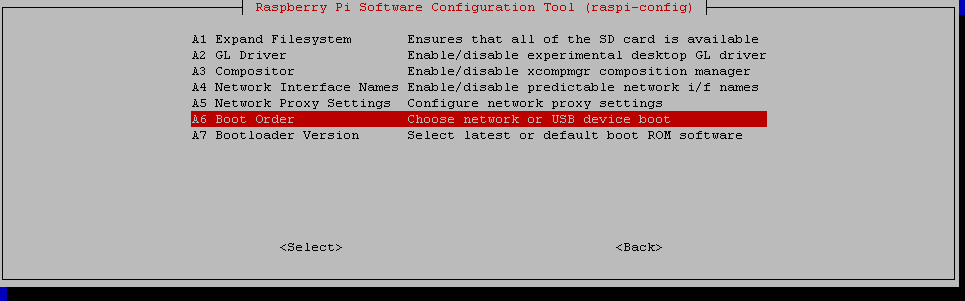
Now navigate to “A6 Boot Order”
Now select “B1 USB Boot” and confirm
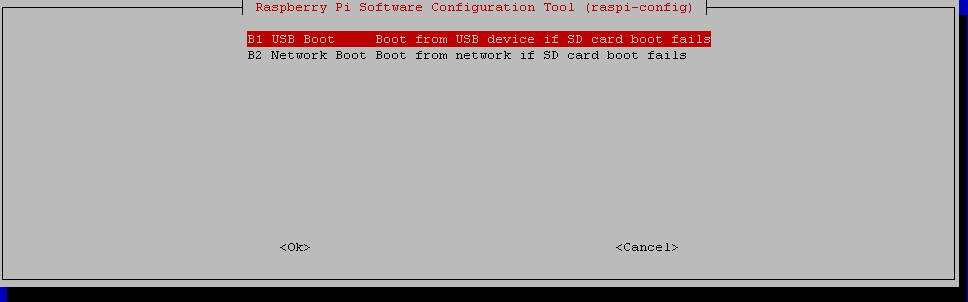
Confirm and reboot when prompted.
Now that you can boot form a USB device it is time to prepare your drive. You can use any USB drive that works with RaspberryPi. Performance on the other hand will vary from a device to device.
So what device should I use?
Obviously, the best will be an SSD drive.
It does not have to be a big one. For the OS alone you can use literally the smallest that you can find. A 120GB drive will be overkill for the system and you can safely assume that it will be more than enough until RaspberryPi 10 will come out. I am speaking about the system alone, not taking into account NAS usage etc.
Pendrives can also be a good choice, but you have to get a fast one. As for the capacity – you can assume that it should be greater than the capacity of the SD card that you want to migrate from. More on that two paragraphs below.
And finally, an HDD. This might sound like a good idea. They are cheap, and usually have the best ratio of price to GB. There is, however, a huge drawback – random read/write time. With sequential read/write time, like a movie or an ISO files you will achieve fairly good speeds, worse than an SSD, but still acceptable. Random read/write times on the other hand, like writing to plethora of small files or system boot time will be abhorrent. Depending on a disk, random read/write times can be as low as 100kb/s. Using an HDD as a boot drive is a horrible idea, save your HDDs for a NAS drive.
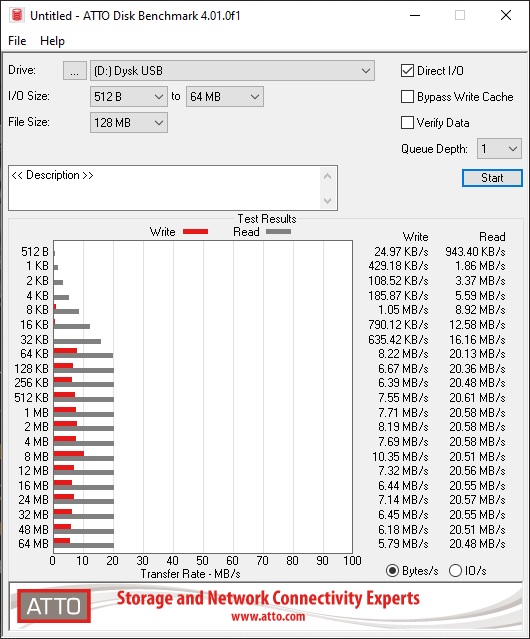
In case you are wondering about the comparison of read/write speed on different devices, look below. This is a comparison of a SanDisk Ultra 32GB SD card vs Kingston DataTraveler G4 32GB. Pendrive is the clear winner here as SD card speeds start in KB instead of MB.
SanDisk Ultra 32GB benchmark data 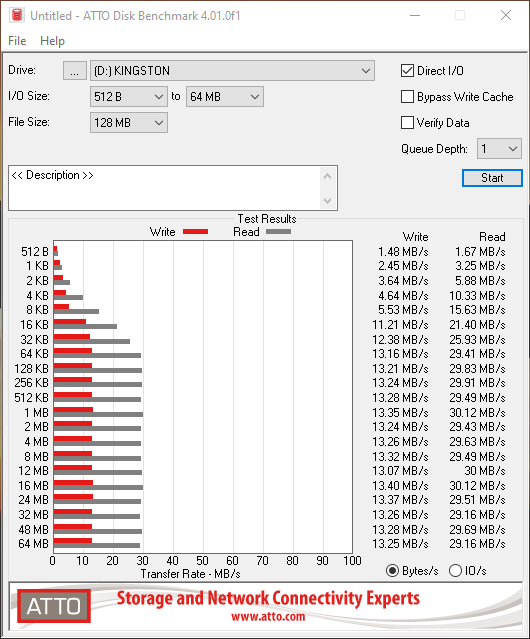
Kingston DataTraveler G4 32GB benchmark data
Moving the contents of your SD card to a USB drive
This one is easy. Just make sure your USB device is bigger than your SD card, otherwise the process might fail. Even if your device is, in theory, of the same size, there might be very small discrepancy in the number of blocks and it will fail due to target device being smaller than the SD card.
On Linux, just use the backup method I detailed here and restore the backup to your new USB device. Basically dd your SD card to the USB device and you are done.
On Windows, use software like Win32 Disk Imager or HDDRawCopy to either, directly dump your SD card to the USB device or just dump it to a file and then write to a USB device.
On RaspberryPi with GUI, you can use SD Card Copier, which is available in the menu under Accessories. The program looks like so
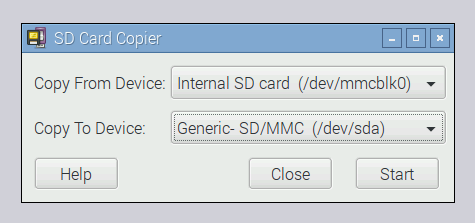
In the top drop-down menu select your SD card (mmcblk0 device) and in the bottom one select you USB device, then click Start.
How to migrate to a smaller drive?
Work in progress, but it is doable.
You need the ability to manipulate linux partitions. You need Linux for that as Windows diskmgmt.msc will not be able to read/manipulate Ext4 partition.
Booting from the USB for the first time
Now that you have an up to date RaspberryPi and the contents of your SD card on a USB drive you can safely power down your Pi.
Caution! Remove the SD card with OS from the slot, if for some reason you put it there again.
Plug your USB device to one of the USB 3.0 ports in the back (blue one) and power up your RaspberryPi. Your system should now boot normally, but from a different device. Give it around 30 to 40 seconds before trying to SSH into the system.
If for some reason the system is not booting up, make sure the process of moving SD card contents to your USB drive has been performed correctly.
Using the whole space on your USB device
Currently, the system uses only the amount of space that was available to it while utilising the SD card. So in essence, if you migrated from 16GB SD card, you still have 16GB of space available, but on a USB drive. It is time to change that.
Open raspi-config with the following command
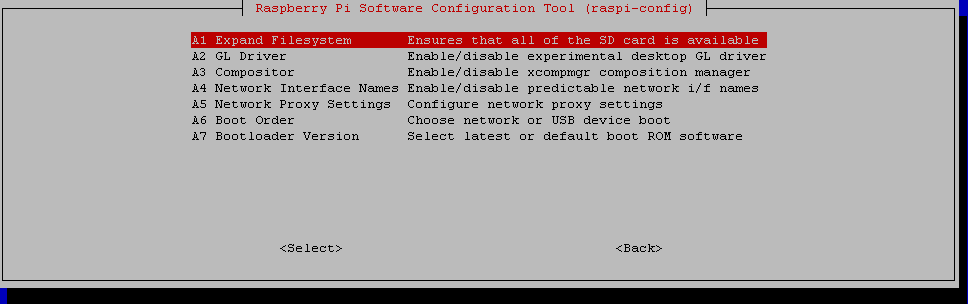
sudo raspi-configNow navigate to “6 Advanced Options” again
This time select the “A1 Expand Filesystem” option
RaspberryPi will perform the expand operation, after which you will be prompted to reboot the system. If you have not been prompted to, reboot now by typing the following command in the terminal
sudo reboot nowAfter the reboot, connect via SSH to your RPi. It is time to check if all went well and the USB device is fully utilised.
Run the following command, and check how much space you have available on your system
df -hMitigating high load when booting from USB (RaspberryOS)
If you are booting from USB and you are experiencing high system loads, reaching even 1.00 do not panic. This is the result of an empty SD card slot. Your system is constantly probing the SD card slot to check if there is anything to read. We can deal with that in two ways.
A) Add the following to confix.txt file on boot partition
dtparam=sd_poll_onceThis tells your system to check for the card in the slot only once. After that, until you reboot, you slot will be locked. If empty it will not read any card you put there, if it discoveres an SD card you will not be able to hot swap it, the only way to change the card is to do a shutdown.
Caution! Be sure to add this in the [ALL] section.
B) Put an SD card in the SD slot. Any card will do as long as it is recognised by RPi. I put an old 2GB card there for testing and yes, works. I have additional 2GB of emergency storage and my load is again low.
It does not matter which solution you chose, your load should be again back to low numbers.
FAQ
Q: Can I boot from USB while I have bootable OS on SD?
A: No.
Q: Can I boot from USB with SD card plugged in?
A: Yes, unless there is bootable OS on it.
Q: Can I use SD card slot if I am booting from USB?
A: Yes, like a regular SD card slot on any computer.
Q: If I have USB boot enabled RPi, can I just flash the drive with OS?
A: Yes.
Quick summary of the process for the impatient
- Check your bootloader version
- Upgrade if needed
- Clone the contents of your SD card to a USB device
- Boot without OS on the SD card
Conclusion
Booting from USB is a great feature that is finally available. Since SD cards are prone to errors, easily damaged due to power failures and sluggish, migrating to USB drive is a logical step to make.
Having said all that, for the time being I will keep using SD card for my OS. This is counterintuitive to what I wrote above, but for my use case scenario it is enough, as all additional services I use keep their files on a USB drive anyways. I just like having a small case with SD cards that have a backup ready to be swapped out in case anything goes wrong or I need a roll-back. I might, however, switch it for a slightly bigger case of pendrives. Who knows.