Once you realize that some services would be much more useful with some external storage, it is time to plug in a disk into your Pi, but you need to partition and format it properly before usage.
CAUTION Remember that partitioning and formatting will lead to data loss! Before you start, back-up any data on the drive!
CAUTION It is best to practice on a device without any data, at the end of the tutorial you will find an example of how to partition and format an SD card.
A word on partitions
First, you need to think about is the number of partitions that you will use. There is no universal solution, you just have to think about the intended use of the drive. You may want to store all data on one partition, but in separate folders, or make a separate partition for each service.
I prefer having one partition with multiple folders, as it helps to scale. Imagine that you set up two equal partitions on a 500GB drive, one for your website and one for a local samba share. It is unlikely that your website will use 250GB, on the other hand, a samba share for video and music might need more than 250MB. In such a setup you will be left with one partition too small and one too large. But the choice is yours.
Checking available storage
CAUTION you might need to boot your Raspberry with the drive plugged in, or reboot after plugging it in, otherwise the device might not get recognized. Such a flaw may present itself while using an unpowered case. Alternatively your SSH session might freeze
Plug your disk into your server and check if the device is being recognized with the following command
sudo fdisk -lAt the bottom of a quite lengthy output you should see an entry similar to the following
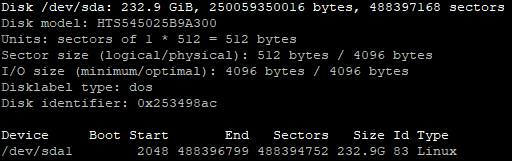
Entry Disk /dev/sda shows the disk itself, the physical device. Partitions of that disk will be listed as /dev/sdaX where X is the number of a partition.
If you have only one partition on a given disk, you will see just /dev/sda1, like on the screenshot above.
If you have more drives, the second will be shown as /dev/sdb with partitions starting from /dev/sdb1, third drive will be /dev/sdc etc.
fdisk -l shows an overview of drives available to you, and will allow to identify partitions belonging to a particular drive. For convenience, partitions on a given drive are listed together.
In case you have trouble identifying disks you can google the Disk model to make sure which /dev/sdX is which disk. But you should be able to figure that on your own.
CAUTION pendrives and SD cards might be shown as Disk model: STORAGE DEVICE. You have to orient yourself by the size of your device in such a case.
Unmounting drives
If you want to make changes to drives that are already mounted, then you have to unmount them first. You cannot make any changes while the drive is in use!
Learn about mounting and unmounting drives in this tutorial
Partitioning a drive
Once you identified the disk you want to change, run the following command
sudo fdisk /dev/sdXReplace X at the end of the command with the letter of the drive you want to change. You will see the following
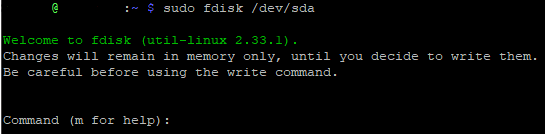
Now you are modifying your storage device. Type m for the list of available commands.
Most useful commands (case sensitive) are
- d – delete a partition
- F – list free and unallocated space
- n – add a new partition
- w – write changes to disk and exit
- q – ignore changes and exit without saving (at any stage)
Deleting partitions
While in fdisk menu, delete a partition with the following
Type d and press Enter
If you have only one partition, it will be selected and deleted automatically. With more partitions you will be asked which partition to delete. Partition 1 will be the /dev/sdX1, partition 2 will be the /dev/sdX2 etc.
Adding partitions
While in fdisk menu, add a partition with the following
Type n and press Enter
You will be asked a series of questions about the new partition. If you press ENTER without any input, then fdisk will use the default setting.
- Partition type – since you are preparing disk just for additional storage, use the default value p (primary)
- Partition number – it is best to create partitions with consecutive numbers, start with the default value 1
- First sector – use the default value since you want to use all available space
- Last sector – if you want the partition to take up the whole disk, use the default value
- If you want to create more then one partition – when specifying ‘end’ of the partition
- You can specify sectors just by typing the sector number itself e.g. 5048
- Or you can specify size in M/GB e.g. +16G (note the + before number!)
- If you want to create more then one partition – when specifying ‘end’ of the partition
- Remove signature – as we will be formatting the drive anyways just say Y
If you want to create more than one partition, see the SD card example below. It is easier to guide you through it.
After you are done adding partitions, type i to see changes and make sure it is correct.
Writing changes to the drive
Now that you partitioned the device, it is time to write changes
Type w to save and exit
System will tell you that all changes have been saved and partition table reloaded. Confirm by using fdisk to list all devices with
sudo fdisk -lLook for the /dev/sdX drive you were modifying in the output and confirm changes.
Initializing a brand new disk
Brand new, store-bought disks need one more step before you can use them. You have to Create a new label first. Which is a partition table.
While in fdisk, before making a new partition, type g for a new GTP table or o for a new DOS table. You can read more about table types in this Wikipedia article. If unsure, just go with GPT.
Upon deciding on a partition table type, you can go ahead and create new partitions.
SD card with multiple partitions example
All storage devices are devided into sectors. If you want to create equal partitions use them for expressing capacity instead of gigabytes. My 32GB SanDisk has the usable sector range from 2048 to 62,333,951.
If I wanted to make two equal partitions sector division would look like so
- Partition 1 – 2048 to 31,166,975
- Partition 2 – 31,166,976 to 62,333,951
Three equal partitions would look like so
- Partition 1 – 2048 to 20,777,983
- Partition 2 – 20,777,984 to 41,555,968
- Partition 3 – 41,555,968 to 62,333,951
However, if I were to use GB instead, the logical conclusion would be to divide the card in two 16GB partitions, right? Not exactly. Due to a difference between how manufacturers describe capacity and the actual capacity of the card, if I would set up the first partition to have 16GB I would be left with the following
- Partition 1 – 16.0GB
- Partition 2 – 13.7GB
This is because manufacturers describe 1GB as 1,000MB while in reality 1GB equals to 1,024MB. That is why a 32GB SD has only 29.7GB and we ‘loose’ storage. No drive will have the capacity declared by the manufacturer, ever.
NOTE in the above example commas are just for readability. Do not type commas while partitioning your drive!
Formatting partitions
Before using a partition you have to format it first.
Formatting partitions is really easy, just make sure you are specifying the correct one as you will lose ALL data contained on the partition.
Formatting is done via mkfs command. Take a look at its syntax
mkfs.TYPE /dev/sdX#- TYPE – specifies the filesystem that your partition will be formatted to
- X – specifies the drive letter
- # – specifies the partition number
Default TYPE of filesystem of RaspbianOS is ext2, use it only if you want to format an SD card. If you are formatting a hard drive, use ext4 instead. You can read why in this Wikipedia article and a quick rundown is available on kerneltalks.com here.
If you want to check all available file systems, to which you can format a partition, type
mkfs.And press TAB twice, system will print all available commands starting with mkfs. Each variation of mkfs command formats a partition to a specific file system. They are all separate commands, following the Linux spirit of “one program should do one thing, but well”.
CAUTION depending on the file system you have chosen and partition capacity, the operation might take five seconds, five minutes or an hour. Do not unplug power during this procedure. ext4 format should be quick though.
Example
Let us assume you want to format the first partition of the only drive attached to your Raspberry Pi to ext4 filesystem, the syntax would look like this
sudo mkfs.ext4 /dev/sda1After a brief moment, and a few prompts, your partition will be formatted.
CAUTION remember that you WILL lose all your data! Be sure to specify the correct partition!
Live partitioning and formatting example
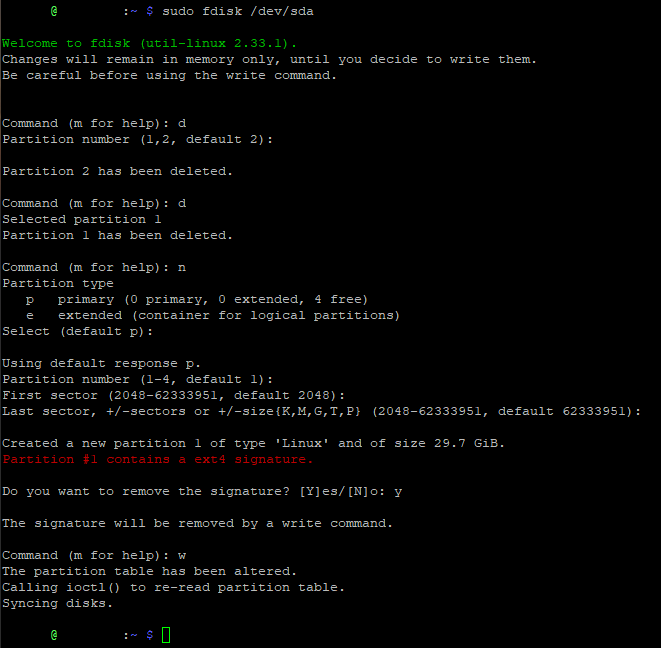
Below screenshots show steps of partitioning an SD card visible as /dev/sda that currently has two ext4 partitions (/dev/sda1 and /dev/sda2). I will remove them, create one new partition and format it to ext4.
Note that I am using default values by not specifying any parameters, as explained above.
Removing partitions and creating a new one
Formatting the newly created partition to FAT and then to ext4
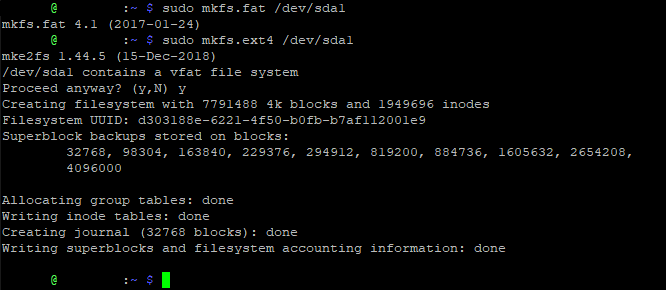
I formatted the partition to FAT firstly, just to show that different file systems have different formatting process.
Common errors
Partition 1 does not start on physical sector boundary
If after creating a partition you encounter the following error after running fdisk -l command
Partition 1 does not start on physical sector boundaryit means that you have to fix the starting sector of that partition.
Long story short, partitions should start on sectors that can be devided by 8. If your start sector is 65535 then, instead of using the default value, just add 1 so that it starts on 65536.
If you do not fix this then your disk might be prone to write errors.
Lazy initialization
This one is not an error, but can be viewed as one by an inexperienced user.
After formatting a drive to ext4, you will notice that system is writing to disk periodically. This is normal and easily observable on an HDD when you hear the disk writing data.
In order to speed up the formatting process, disk inodes are not cleaned during the format. It is done afterwards so that the disk can be used right away.
Give the drive some time and do not power down your server. Just wait for it to finish. HDD drives will not go to sleep, nor will they spin down until the process is completed. The bigger the drive, the longer you will have to wait.
During lazy initialization the disk if fully usable.
Conclusion
Partitioning and formatting is quite easy, however, you have to be mindful of disks you are modifying. It is easy to mistake /dev/sda1 for /dev/sda2 and format the wrong partition. Double check any command you are issuing as there is no turning back once you commit by pressing ENTER.
I had to reinstall my laptop once since instead of writing to /dev/sdb I typed /dev/sda effectively formatting my boot drive. Be cautious, Linux assumes you know what you are doing. Even if you do not.
Is something unclear or you would like me to expand on a particular aspect? Leave a comment below!