

Mumble is a free and open source, high quality and low latency voice and text communicator. Mainly targeted at gamers with many game overlays available out of the box, however, it can be used by everybody to chat and connect.
Not only it has very little resource consumption, but also provides a high quality connection. Additionally, being open source and stand alone, your data remains yours. No big corporation is snooping into your, or your user’s, information. Moreover, Mumble can be configured to use your server’s certificate to provide encrypted connection.
Recommended
Apart from a running server you do not really need anything. However, if you want your server accessible from outside your local network, you need to configure your router to allow access. In such a case you should harden security on your server with UFW and SSHGuard or Fail2Ban.
Check out links above for guides.
Caution! If your server is accessible from outside your local network, make sure you are not using a default login credentials for your Raspberry. It is recommended to delete the default user and use auto banning software like SSHGuard or Fail2Ban, and do not forward port 22 for SSH access from outside LAN at all.
Mumble server installation
In order to install your server just type the following command
sudo apt install mumble-serverAfter the installation, server is automatically started, you can confirm that with the following command
sudo service mumble-server statusCaution! By default Mumble is not started with root privileges. More on that in a moment.
Caution! By default your server is accessible to anyone who knows the IP address of the server. More on that below.
Accessing your server from outside your LAN
In order to access your server from outside of your local network, you have to forward Mumble port on your router. Check out this tutorial on port forwarding to see how.
By default Mumble uses port 64738
Mumble client installation
In order to connect to your server, you need a client application which will enable the connection.
Navigate to mumble.info and download a client for your operating system.
After the installation, open the client. On desktop you will have to configure the program. Follow any on-screen prompts to setup your sound system. As this part is dependent on your system, I will not provide a guide for it.
You will also be prompted to create a certificate. This is a user certificate. It is used to authenticate the user, not the server. Every user has its own certificate. Allow Mumble to automatically create said certificate.
Note! In order to use Mumble as a text chat only, you do not have to configure sound at all! However, you will not be able to hear other users nor speak to them.
Connecting to your Mumble server
In order to connect to your Mumble server open the Mumble Server Connect list by clicking on the globe icon, if it has not been opened by default
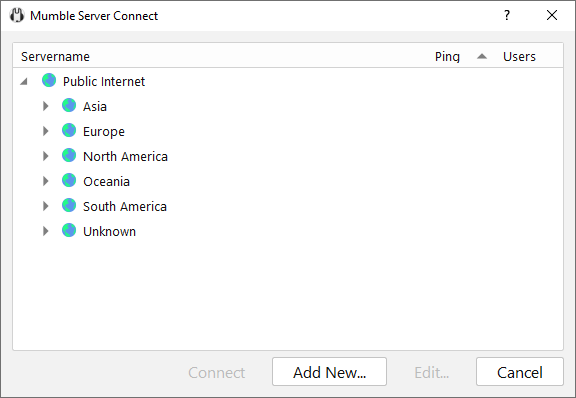
Click on Add New… at the bottom.
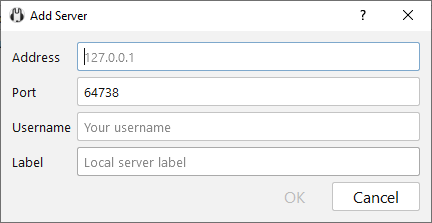
Fill out the required information.
Address
If accessing from LAN, use your local server IP address.
If accessing from the outside use your external IP address. You can check out your external IP address on ipfingerprints.com website.
Alternatively, if you have a domain, you can use the domain name to connect as well.
Port
Leave default and do not change.
Username
Provide a username you wish to be known as on the server.
Label
This will be the name of the server on your Favorite servers list.
Now click OK and server data will be added to your Favorite servers list.
Click on the server you have just added and then click on Connect.
If you have a password on your server, you will hear an error and you will be prompted to input the password, like so
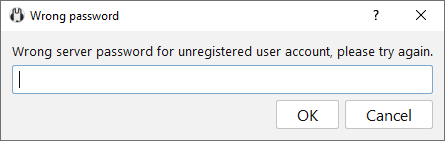
Some clients allow for password input when adding a server, so you can put it there. If you do not have a password then, obviously, leave the field blank.
At this point, after connecting, you should be able to use the service you have set up.
Mumble configuration
By default, Mumble uses a self-signed certificate, there is no password and all data in config file has default values.
First, you need to change a few settings and setup the SuperUser password for admin access on your server by reconfiguring mumble-server package
Run the following command
sudo dpkg-reconfigure mumble-serverThis will bring up a short configuration, if at any point you want to change settings, you can run the command again.
Start at boot
If you want to start Mumble server after the machine boots up, answer Yes. Otherwise the server can be started with the following command
sudo service mumble-server startNetwork priority
If you want your server to prioritize Mumble service to allow for better connection, answer Yes.
Caution! If you want to use your own SSL certificate for encryption, you have to use high priority, as Mumble is then started with root privileges. If not started with root privileges, client will not be able to access your LetsEncrypt certificate in the default folder!
SuperUser password
Type in a password that will be used for your administrative account on the server.
Mumble configuration file
Mumble provides a configuration file to tweak your server settings. In order to modify it, run the following command
sudo nano /etc/mumble-server.iniCaution! Do not change values if you are unsure of what they do!
Note! By default, some values have a semicolon (;) at the start of the line. In order to use those parameters, you have to remove that character.
There are a few parameters that you should change
- logfile – this will be your default log file location. Unless you want it to be elsewhere, leave the default
- welcometext – this will be the text that is displayed upon connection to the server, remember to put the text in quotes
- serverpassword – you can put your server password here
- users – this will denote the maximum number of concurrent users that can be connected to your server. For every 1GB of ram on your machine you can serve about 100 users
- allowping – decide if you want your server to be reachable with ping command. Setting to true will expose the server’s current and maximum user count, as well as some other information. For privacy, change to false
- registerName – changing this will change the default channel’s name, set to whatever you want
Remember to restart the service to reload settings with the following command
sudo service mumble-server restartAt this point your server is ready for use.
Using a certificate
You can use LetsEncrypt’s certificate that you have for your website. If you want to use a custom certificate, modify two additional fields in the mumble-server.ini file
- sslCert – provide a path to your certificate
- sslKey – provide a path to your certificate’s key
Provide the certificate paths to your .pem files here
Caution! In order to use Lets Encrypt certificates stored in their default location, Mumble has to be run with root privileges. See above how to do it by configuring Network Priority.
For a refresher on SSL certificates check out this tutorial. Using a certificate issued by an authorized CA will mark your server as trusted by default.
If you do not provide a certificate path, Mumble will issue a self-signed certificate for encryption, however, all users will be warned upon connecting that the certificate if self-signed and that the server might be dangerous.
SuperUser
Right now your server has only the main channel. In order to change that, you have to log in to your server with SuperUser account.
Open your Mumble client and navigate to Mumble Server Connect list.
Put your server information, however, in the Username field type superuser
You will have to put the SuperUser’s password in the additional field that will pop up. Put the password that you set during Mumble configuration step, this is NOT the default server password.
After a successful login you can now add or remove channels. On desktop this is done by right-clicking on the channel list.
Additional features
Mumble additionally allows for
- Registering users
- Extensive user control, such as granting administrative privileges
- Server ping to show current and maximum user number
- Web plugins to show server status
As this is a basic guide I will not go into details of administration here, however, you can grant admin rights to currently logged users. If needed, you can ban, mute or kick as well.
Conclusion
Mumble is a very useful communication service that can be used as text or voice chat. It runs on almost all machines as there are clients for Windows, Linux, Apple and Android devices.
Being lightweight, it does not drain many resources as a server nor as a client, and can be installed on your existing server.
If you have any questions, feel free to leave a comment below.