

Nextcloud is a service that mirrors functionality of cloud storage services like Dropbox or Google Drive, except you can run it on your own server. Forget about space restrictions, you will be bound only by the amount of storage plugged into your RaspberryPi and your internet bandwidth.
Requirements
Install Apache web server, PHP and MySQL before starting this tutorial. You will not be able to complete this tutorial without them.
Nextcloud requires at least 512MB of PHP dedicated RAM. It will run with less, but performance will be next to unusable. You can run it even on Pi0, but just be warned that results will be less than satisfactory. Even accessing the site will be a pain…
Additional PHP modules needed
- zip
- xml
- mbstring
- GD
- cURL
If you are running a vanilla server, you will need to install a few additional PHP modules before using Nextcloud. Find out how to install those packages in this or this tutorial.
CAUTION to avoid installation of unnecessary modules try accessing your Nextcloud server first and check for errors beforehand. Some modules are grouped in a single package, so install them one at a time and refresh the page to see what is missing. Remember about restarting Apache after each module installation.
Any errors will present themselves during First time run part of tutorial.
Nextcloud folders setup
To setup the service, you need to create a folder from which it will be accessible. As with all web-based services /var/www/ is a good choice. Create the folder with the following command
sudo mkdir /var/www/nextcloud
sudo chmod -R 770 /var/www/nextcloud
sudo chown www-data:www-data -R /var/www/nextcloud
To avoid access problems add yourself to www-data group! Check how to do that here!
User data folder
All your data can be stored inside your main Nextcloud folder, however, it is a good idea to move it somewhere more secure. You can create the folder wherever you like. Even on an external device mounted to your server. Check out here how to mount external storage.
For the purpose of this tutorial we will create an additional folder for user data. Run the following command
sudo mkdir /nextcloud
sudo chown -R www-data:www-data /nextcloud
sudo chmod -R 770 /nextcloud
If you want to mount external drive in /nextcloud folder. After mounting your drive, run the following again
sudo chown -R www-data:www-data /nextcloud
sudo chmod -R 775 /nextcloud
CAUTION it is very difficult to move your storage folder after the installation. It is best to decide on your permanent data folder now.
Downloading Nextcloud package
You can download Nextcloud package and upload it via FTP. The easier way, however, is to just do everything on your server directly.
First of all visit nextcloud.com, copy the direct link to the package by right-clicking on Download Nextcloud button and selecting Copy address link.
Now navigate to your Nextcloud folder. Server data, not user data folder
cd /var/www/nextcloudOnce inside, run the following set of commands
wget https://download.nextcloud.com/server/releases/latest.tar.bz2
unzip $nextcloud_package_name
mv nextcloud/* .
Substitute variables for appropriate names. Contrary to WordPress, Nextcloud does not use latest.zip filename for the latest release, sorry.
As there are many files in the package, unzipping will take a significant amount of time. Be patient.
CAUTION make sure that index.php file is directly in /var/www/nextcloud folder.
You can remove unnecessary files by running
rm -R nextcloud/
rm $nextcloud_package_name
All files will be owned by your user, we need to change that to www-data. Run the following again
sudo chown -R www-data:www-data /nextcloud
sudo chmod -R 770 /nextcloud
Configuring Apache web server
To run the service you have to configure Apache web server. To learn how to do that see this tutorial.
Quick setup, for the impatient
Below instructions will configure Apache web server so that your Nextcloud service is accessible via the following address in your browser
your.raspberry.ip.address/nextcloud/

e.g. 192.168.0.100/nextcloud/
If you get a proper domain, it will be accessible via the following link (no extra setup needed)
example.com/nextcloud/Learn how to get yourself a free domain here
To set up an alias run the following
sudo nano /etc/apache2/mods-enabled/alias.confAdd the following code at the bottom
<IfModule alias_module>
               Alias /nextcloud/ "/var/www/nextcloud/"
               <Directory "/var/www/nextcloud">
                       Options FollowSymlinks
                       AllowOverride None
                       Require all granted
               </Directory>
</IfModule>
To set up a virtual host for Nextcloud website run the following
sudo nano /etc/apache2/sites-available/nextcloud.confInside, paste the following
<VirtualHost *:80>
        Alias /nextcloud "/var/www/nextcloud/"
        DocumentRoot /var/www/nextcloud
        ErrorLog ${APACHE_LOG_DIR}/nextcloud_error.log
        CustomLog ${APACHE_LOG_DIR}/nextcloud_access.log combined
</VirtualHost>
Enable Nextcloud website config with the following
sudo a2ensite nextcloudRestart Apache with the following command
sudo service apache2 restartMySQL database
As with most services, you have to have a separate MySQL database for Nextcloud. Create a user and a database now. You can name them whatever you like, but make sure to remember what names and passwords you used, as they will be needed in the next step.
To learn how to create MySQL database and user see this page.
First time run
Service is almost complete. Access your server with the following link
your.raspberry.ip.address/nextcloud/CAUTION you may run into an error stating that you require additional PHP modules. It will look similar to the below screenshot. Check the beginning of this tutorial to see how to fix that!
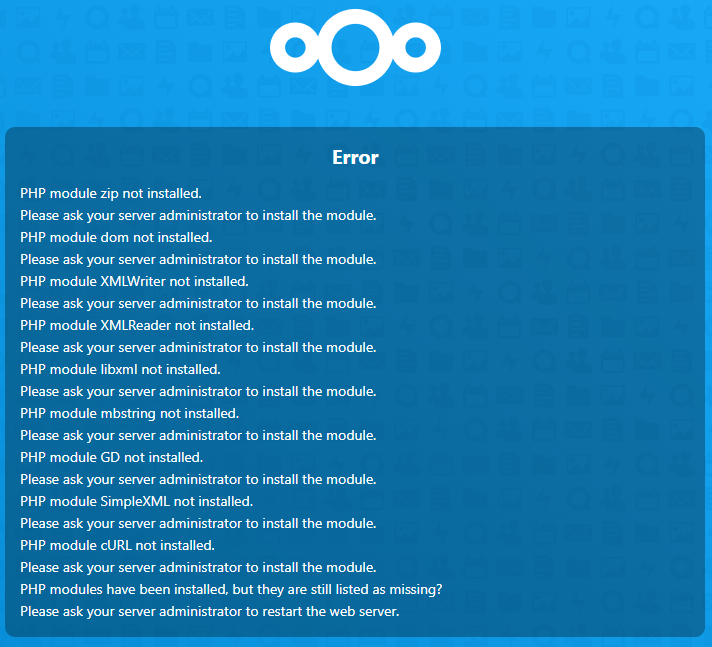
After installation of all required PHP modules and refreshing the page, you will be presented with the following screen
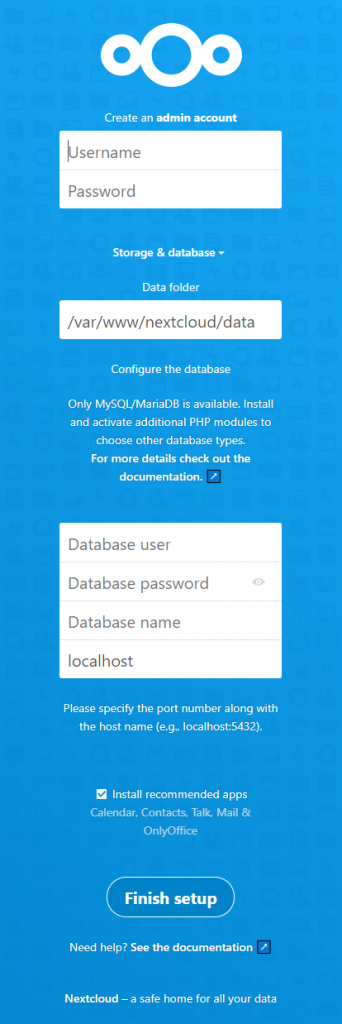
Now you will need to input some information
- Username – this will be the name of your administrative account
- Password – password for the above account, make sure to put it correctly, as Nextcloud does not ask you to repeat the password to make sure you put it right!
- Database user – put the MySQL database user name created for Nextcloud
- Database password – put the MySQL database user password
- Database name – put the MySQL database name
- localhost – leave as localhost
NOTE It is a good idea to uncheck the box next to Install recommended apps, you can always install additional plugins as you go.
Now click on the big Finish setup button at the bottom!
CAUTION beware, the installation takes a long time. Do not close the page before it is completed! On Pi0 it takes about 20 minutes!
NOTE if something goes wrong here – delete and recreate your database, additionally wipe your /var/www/nextcloud folder and download files anew. Should be a quick process, now that you know how to do it. You have to do it this way because your admin account will be created and only some portion of the database, leaving the service inoperable.
First time login
After the installation is completed, you will be redirected automatically to a website similar to the below
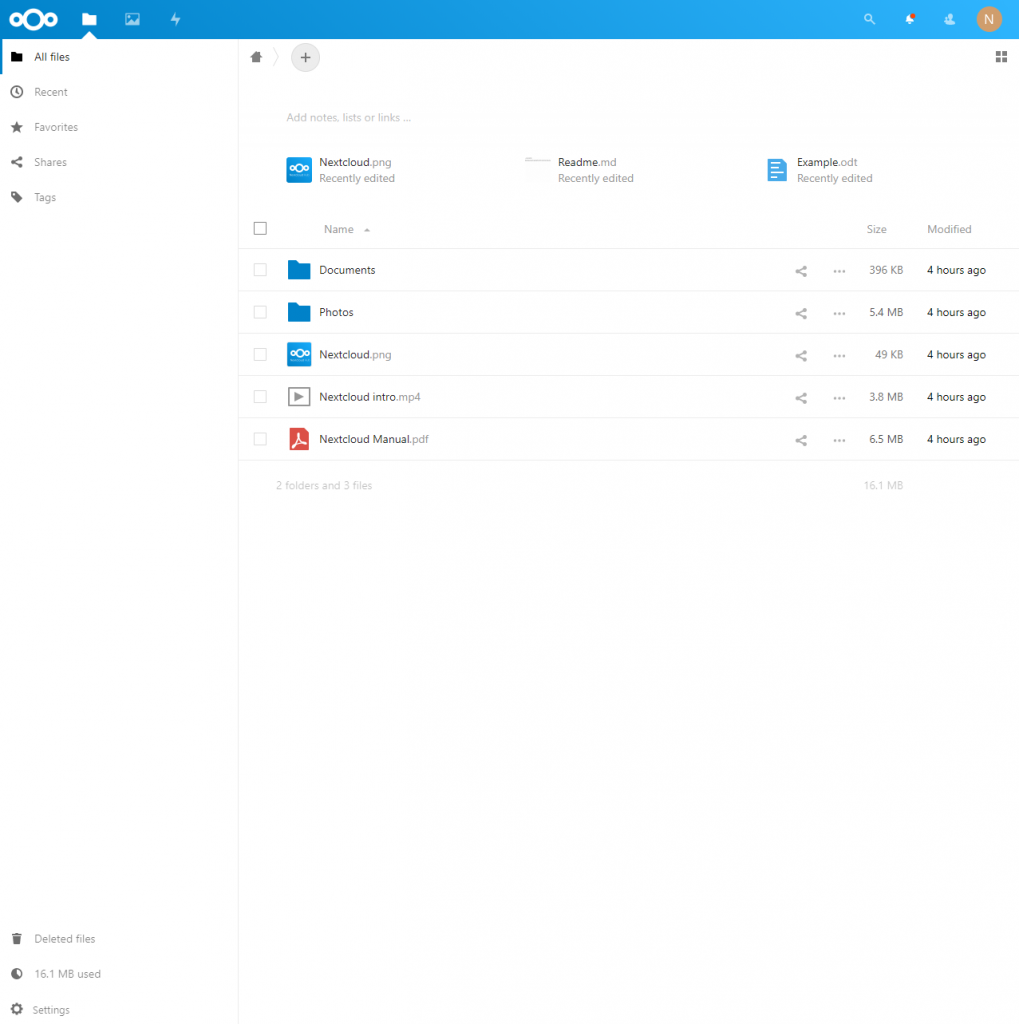
You have been automatically logged with your administrative account that you created during installation process. Nextcloud, by default, placed some files in your account. A user manual is among them. You can see the files in the center of your screen.
If you are familiar with cloud based file hosting, you should feel like home.
Creating additional users
Using administrative account for file storage is not the best idea out there. Create a new user for yourself with unlimited data cap. If you plan on granting additional people ability to store files on your server, you may create accounts for them as well.
CAUTION Nextcloud service accounts are separate form server users.
To set up an additional account
- Click on the round icon in the upper right corner of your screen (either a cog or an initial of your username)
- Select Users
- On the left hand side click + New user
- Fill out Username, Password and Default quota
- Click on the big blue button on your right with a check mark to finish
You may change all user data at a later time.
Common errors
You are using a fallback implementation
If you navigate to Settings / Administration / Logging you may encounter the following error being spammed every second
Error: You are using a fallback implementation of the intl extension. Installing the native one is highly recommended instead.This just means that you need one more PHP module called intl. Scroll up to learn how to install it.
Some files have not passed the integrity check error
If you navigate to Settings / Administration / Overview you may encounter the following error
Some files have not passed the integrity check. Further information on how to resolve this issue can be found in the documentation. (List of invalid files… / Rescan…)It notifies you that either your User data folder (/nextcloud in our example) or Service folder (/var/www/nextcloud in our example) have additional files that are not supplied with installation or did not come from the installation zip package.
To resolve it, remove the leftover zip file and nextcloud folder from /var/www/nextcloud
If you have mounted external storage directly in your /nextcloud folder, it will contain additional Linux folders which will produce said error.
To resolve it, create a folder specifically for mounting your storage and after mounting a drive, create your Nextcloud User data folder inside the storage instead of using the actual storage itself. Like so
/external_ssd/nextcloudWhere /external_ssd is the folder for mounting your drive. I know, sounds difficult, just practice mounting external drives and you will understand it in no time.
Changing PHP memory limit
By default PHP is alloted 128MB of RAM. You need at least 512MB to use the service comfortably. Nothing is preventing you from setting up a higher number, however, remember that it will be reserved for PHP and your server OS, and other services for that matter, need RAM as well. Do not go overboard. If in doubt just set up 512MB.
CAUTION RaspberryPi 0 has only 512MB of RAM. If you set PHP memory to 512MB your system will crash as there will be no memory left for anything.
To change PHP memory limit run the following command
sudo nano /etc/php/7.3/apache2/php.iniCAUTION if you have different PHP version you will have to amend the path accordingly! At the time of writing PHP version available for Raspbian is php7.3. In general, you are looking for php.ini file.
Now move down until you get to Resource Limits section of the file. Find the following line
memory_limit = 128MAnd change it to
memory_limit = 512MAccessing your Nextcloud outside of your local network
It is possible, and quite easy, to access your server from outside. All you have to do is forward ports on your router so that they are pointing to your server on local network.
Learn how to do that here
Nextcloud, being web-based service uses port 80 for unencrypted connection, and 443 for encrypted.
CAUTION without a domain and an SSL certificate ALL your data is sent unencrypted in the open and can be spoofed. Without encryption via https it is unwise to transfer any sensitive data. In all honesty even logging in is not recommended, as your password might get stolen, especially through a public Wi-Fi.
Learn how to get a free domain and configure it here
Learn how to get a free SSL certificate for your server here
Conclusion
Setting up your very own cloud based file hosting is quite easy, takes about an hour if you understand the process. However, it is imperative that you use SSL encryption to protect your data. Now depending on your internet connection upload and download speeds might not be satisfactory for transferring larger files such as movies, music, your Photoshop PSD files etc. but it will be perfect for smaller documents. And more importantly – you will have access to them wherever you want, provided you paid your power and ISP bills on time.
Is something unclear? Did I miss something? Have a question? Leave a comment below.