

Word of caution before you begin
The biggest hurdle you will encounter when mounting disks to Raspberry Pi is the power usage. Some disks, require more power than others. This is not an issue with a regular PC, as it delivers greater amount of power than needed for using a disk, but Raspberry will have problems.
If you are experiencing any difficulties with using a disk, such as video stuttering or general access trouble, then consider changing the case for a powered one.
How Linux treats drives
Contrary to Windows, Linux treats partitions as folders. They can be placed anywhere you want them to be, instead of being constrained to a lettered drive. If you want to put the partition directly on the root system, you can do it. If you want to mount it in /var/ folder, you can do that as well.
Windows automatically mounts any partition that it detects, if you plug a pendrive to your PC, it just shows up. Windows streamlines the process and correctly assumes you want it to show up immediately, and acts by mounting the partition. This is not the case on Linux.
Upon plugging a drive to your Linux machine it is acknowledged by the system, but partitions are not mounted. User can choose where to mount a partition, as they are treated as additional folders for you to use as far as the system is concerned.
Creating a mount folder
Now that you know how Linux treats drives, it is time to decide where you want to mount it. It can be anywhere, almost, but remember that the drive should be mounted in an easily accessible place and navigating to /var/john/drives/disk1/partition1/ might be inconvenient. I am not saying you cannot mount it there, but you can mount it a more user friendly place.
For the purpose of this tutorial let us assume that you want your drive accessible from the folder /drive1. Run the following commands
sudo mkdir /drive1
sudo chmod -R 775 /drive1
The above will create a folder drive1 right on the root of your filesystem. any time you want to access it you can just type /drive1 in the path. Modify chmod accordingly if you have a specific use for the drive. Otherwise leave it at 775. Setting chmod to 777 will give everybody full access.
Proper file system
Partitions should be formatted to ext4 file system, so that Raspberry can read it without any problems (ext2 if using an SD card). It is possible to use other file systems such as NTFS. For convenience, it is best to use the native Linux ext4 file system. Learn how to format your drives here.
Listing drives
In order to mount a drive you have to know what drives are available for mounting. Run the following command
sudo fdisk -lAt the bottom of output you should find an entry similar to the following
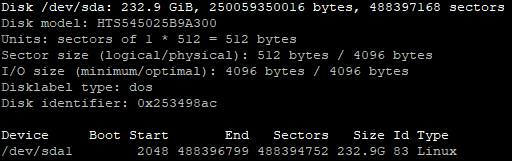
Entry Disk /dev/sda shows the disk. However, you should mount the partition, and not the disk itself.
Partitions will be listed as /dev/sdaX where X is the number of a partition.
If you have only one, you will see just /dev/sda1, like on the screenshot above.
If you have more drives, the second will be shown as /dev/sdb with partitions starting from /dev/sdb1, third will be /dev/sdc etc.
fdisk shows an overview of drives available to you and will allow to identify partitions belonging to a particular drive.
In case you have trouble identifying disks you can google the disk model to make sure which /dev/sdX is which disk.
Mounting a partition
Run the following command to mount your partition
sudo mount /dev/sda1 /drive1Now your disk is available through /drive1 folder. Hardest part was finding the correct partition to mount.
Mounting a partition to a folder with files
It is possible to mount a partition to a folder that already contains files. System will not prevent you from doing so, however, bear in mind that those files will not be accessible as long as the partition is mounted in that particular folder.
Unmounting a drive
If for some reason you want to unplug your drive from a running system, it is best to do it safely by unmounting it first. Unless you physically unplug it, the drive will be accessible to your system if you want to mount it again or modify somehow (e.g. format a partition).
The biggest difference is that it will not be readable or writeable, so unplugging it will not affect data, and in turn you will avoid any corruption that could happen should you unplug a drive that is in the process or writing to disk.
CAUTION remember that if you have multiple partitions mounted on a given drive, you should unmount all of them before unplugging it the drive!
In order to unmount the drive from the example above, run the following command
sudo umount /dev/sda1It is now safe to unplug your drive from your machine.
Mounting a drive permanently
Since drives have to be mounted manually, upon a system reboot they will not be mounted by default. You can, however, modify this behavior if you have a drive permanently attached to your Raspberry.
In order to do so, you have to modify the fstab file located here
/etc/fstabBut first, you need to gather some more information from your system to be sure that the exact same partition will be mounted to the exact same location every time. If you attach a second drive, depending on USB ports you use, it might take place of your disk in /dev/sda and consequentially your /dev/sda1 partition might change.
CAUTION Read warning about unusual partition identifiers below first!
Run the following command
blkidThis is the typical result

As you can see at the very bottom we have our /dev/sda1 partition. Take note of the following
- TYPE=”ext4″
- PARTUUID=”253498ac-01″
Those two parameters will allow us to mount the partition upon system reboot.
- TYPE denotes the filesystem of the partition
- PARTUUID denotes a unique partition identifier
Just to be on the safe side make a copy of fstab file with the following
sudo cp /etc/fstab /etc/fstab.oldNow you can safely modify it. Run the following command
sudo nano /etc/fstabYou will see an output similar to the below

Now add one more line like this

Quick explanation of the line
- PARTUUID – unique partition identifier that you found out earlier, do not use quotes
- /drive1 – mount point for the partition (folder where it should show)
- ext4 – filesystem of the partition
- defaults,auto,rw – you can just put the default, this denotes the partition behavior
- 0 – for backup purposes, leave at 0 unless you know that you need it changed
- 2 – denotes order of scanning by fsck at boot if something went wrong, leave at 2
Save the file, and upon a reboot your partition will be mounted automatically.
Unusual partition identifiers
Some drives produce unusual PARTUUID identifiers and you will not be able to properly mount the drive using said PARTUUID directly. Your Pi might not boot with such an entry. Drive I currently use has a very long id which, unfortunately, is not recognized.
The solution is to use /dev/sdX# instead in your /etc/fstab file.
Downside is that if you have multiple drives or pen drives plugged in, you will have to plug them in the same USB slots every time.
If your Pi is not booting due to an unusual PARTUUID after modifying fstab you will have to change the file and remove the line at fault. Unfortunately it will have to be done on a system which reads Linux file system. Windows is out of the question.
If you have a different device with Linux then just use it to browse the SD card and modify fstab file.
If you do not have an additional Linux device then the easiest solution is to download a Linux distro that runs from a USB, boot your system from a USB drive and then browse the SD card to modify fstab.
Alternatively, you can use a different SD card to set up Raspbian, mount the card with a faulty fstab entry and modify it.
Further reading
In case you want to read more about fstab you can check out the manpage entry by typing
man fstabor by reading this.
Conclusion
Mounting and unmounting files on Linux might be taxing at first. And most definitely is not an intuitive process, but once you learn how to do it and understand the process it will become easy. Take it slow and you will master it in no time.