
Do you see that padlock in the address bar right next to the address of this website? That means that this page uses an SSL certificate to encrypt traffic between you and my server. Any data you send to a website that utilizes a certificate (including this one) is safe. But how does it work?
A certificate consists of two files, private key and public key. Both are stored on the server, however, only public key is sent out to clients accessing a service. Any data traveling between your browser, or a client using a service, is encrypted using that public key. Server decrypts data using the private key. This way you can safely use credit cards or log to services like email, cloud etc. without fear of leaking your data. This prevents attacks such as packet spoofing (man in the middle attack), but also tells users that your server is what it claims to be. If you want to learn more check out this video from DigiCert on Vimeo.
Requirements
- Server running http engine, like Apache web server
How to get a certificate?
There are many ways you can obtain a certificate. Most common is to just buy such a certificate. You can get it from a Certificate Authority (CA), a reseller that is authorized to issue such a certificate. If you are renting server space, the provider usually has a means to sell you a certificate as well and integration is quite easy. However, you have to pay for certificates issued this way. Depending on CA this can be quite expensive and certificates have to be renewed usually on a yearly basis. If you want a wildcard one the cost will be enormous!
If you are self-hosting a server you can get certificate for free via CertBot. This is a program utilizing Let’sEncrypt certificate authority that helps you protect your server. In this tutorial we will focus on obtaining such a certificate.
Standard certificate vs wildcard
There are two types of certificates.
Standard default certificate – this one certifies exact domain names. It can hold multiple domain names, however, in order for SSL to work, the domain must be specified exactly. Let us assume you have a domain example.com, a subdomains mail.example.com and forum.example.com. All three will have to be specified in such a certificate. If you add a subdomain you will have to obtain a new certificate to include it.
Wildcard certificate – this one certifies only the root domain. It is valid for any subdomain that you use. Instead of specifying an exact domain it just says *.example.com. It is very convenient, however, CertBot supports only a number of hosting providers when issuing a wildcard certificates. For your self-hosted server you will have to use a standard certificate.
Manual certificate vs automatic
There are two ways you can obtain a certificate with CertBot. Either by obtaining it automatically or manually.
Automatic – CertBot, based on your http engine, obtains a certificate and sets up automatic renewals. This is the preferred way.
Manual – you obtain a certificate manually, renew it manually and implement it manually. Unless you need it done in this way for some specific reason, manual certification should be avoided.
Installing CertBot
To install CertBot navigate to this page
- CertBot Instructions – certbot.eff.org/docs/install.html
- Scroll down to Operating System Packages
- Follow the instructions for your OS, if you followed my guide that will be Debian, as a reminder – RaspberryOS is a fork of Debian
Now just follow prompts from CertBot instruction pages and you should have a certificate in no time!
Important points
- Select all websites that you are running on your server upon installing your certificate
- Allow CertBot to redirect traffic from http to https
- Remember that you will have to open port 443 to access encrypted version of your website! Click here for a refresher on UFW. Unencrypted http uses port 80.
Certificate location
SSL certificate can also be used for other services, not only a website. You can use it for your email server, FTP server etc. It is a good idea to know where your certificate is so that you can use just the one for all your services.
Upon installation CertBot will tell you exactly where it is stored, but if you did not manage to write it down somewhere it should be in the following folder
/etc/letsencrypt/live/example.com/fullchain.pem
/etc/letsencrypt/live/example.com/privkey.pem
CAUTION as certificates should be stored securely and no one but the webmaster should be able to access them you will need root access to navigate to this folder! Sudo user will not be able to go there, you will need to actually become root for this. However, you should have no need for that.
Testing your website
Now you should be able to navigate to your website by typing
https://yourwebsite.com/
And look for a padlock icon next to your domain address.
If you have any problems, check if your certificate is valid and has no issues here: www.websiteplanet.com/webtools/ssl-checker/
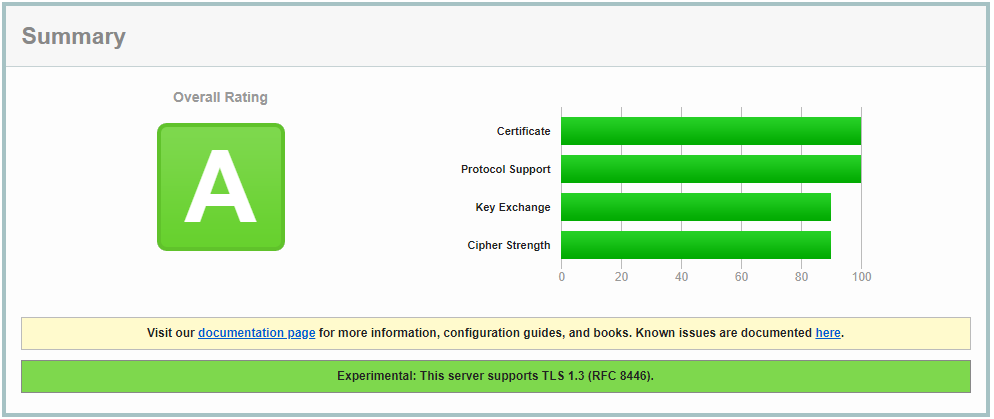
For more detailed test navigate here to SSLlabs – www.ssllabs.com/ssltest/
After a rather lengthy test you will receive the score, or the website will tell you what is wrong. Take a look at this website score below
Apache configuration
If for some reason you need to manually append Apache configuration take a look below. There are two virtual hosts configs. One for http unencrypted access which will redirect user to encrypted version of your website and a virtual host for encrypted version of your website.
Unencrypted redirection host
<VirtualHost *:80>
        ServerName example.com
        ServerAlias www.example.com
        ServerAdmin webmaster@example.com
        DocumentRoot /var/www/example.com
        Redirect permanent / https://example.com/
        ErrorLog ${APACHE_LOG_DIR}/example.com_80_error.log
        CustomLog ${APACHE_LOG_DIR}/example.com_80_access.log combined
        RewriteEngine on
        ServerSignature Off
</VirtualHost>
Encrypted website version
<IfModule mod_ssl.c>
<VirtualHost *:443>
        ServerName example.com
        ServerAdmin webmaster@example.com
        DocumentRoot /var/www/example.com
        ErrorLog ${APACHE_LOG_DIR}/example.com_443_error.log
        CustomLog ${APACHE_LOG_DIR}/example.com_443_access.log combined
        Include /etc/letsencrypt/options-ssl-apache.conf
        ServerSignature Off
        SSLProtocol -all +TLSv1.2 +TLSv1.3
        SSLCertificateFile /etc/letsencrypt/live/example.com/fullchain.pem
        SSLCertificateKeyFile /etc/letsencrypt/live/example.com/privkey.pem
</VirtualHost>
</IfModule>
Just amend the above config files for your website and enable them, learn how to do that in Web server – Apache2 tutorial.
CAUTION Make log files separate by giving them unique names. That way you will be able to troubleshoot any problems easily!
CAUTION Remember about changing the certificate location as well!
Testing certificate renewal
If all went well, your certificate should be renewed automatically every three months. You can test if that is working with the following command
sudo certbot renew --dry-runConclusion
Certificate is one of the most important things you can implement on your server. It protects both users and the webmaster. If you are using a trusted machine without key logging software your passwords and data will be safe and secure from prying eyes. All traffic will be encrypted. Nobody will be able to spoof your passwords even if the packet containing it would get into the hackers hands. At least in theory, in practice you have to remember that all security measures can be broken with enough time and dedication. However to be able to decrypt such a complex lock the average attacker would need years. Unless you have a corporate site with very valuable data nobody will bother.
Get yourself encrypted, protect your website and your data! If not for you then do it for people that will be using your website or services on your server!
Do you have a comment, something is no clear? Leave a reply below