
This tutorial will guide you through installation of Rainloop webmail on your server. It is a service that will allow you to use your email server through any web browser.
Requirements
- Apache web server
- Email server
- PHP
- xml module for PHP
- curl module for PHP
- MySQL – optional
Check out how to install missing PHP modules here
MySQL is completely optional, however, it will allow you to add address book functionality to your webmail.
Automated script to set up your webmail
If you are a lazy person, then you can skip the next two sections as Rainloop webmail can be set up with a simple script.
Create a new file with
nano webmail.shInside paste this code
#!/bin/bash

#Create an alias for Apache2 web server
#Modify directory paths if you want to install service in a different direcotry
echo "<IfModule alias_module>
	Alias /rainloop "/var/www/rainloop/"
	<Directory "/var/www/rainloop/data">
		Options -Indexes
		Deny from all
	</Directory>
</IfModule>" >> /etc/apache2/mods-enabled/alias.conf

#Create direcotry for Rainloop
mkdir /var/www/rainloop
chmod -R 777 /var/www/rainloop

#Download package
cd /var/www/rainloop
wget https://www.rainloop.net/repository/webmail/rainloop-community-latest.zip

#Unzip package and remove the zip file
unzip rainloop-community-latest.zip
rm rainloop-community-latest.zip

#Set proper permissions to the folder
chmod -R 750 /var/www/rainloop
chown -R www-data:www-data /var/www/rainloop

#Restart Apache
service apache2 restart
CAUTION change /var/www/rainloop paths if you want Rainloop installed in a different direcotry.
Now issue the following commands
sudo chmod +x webmail.sh
sudo ./webmail.sh
Now skip to First time admin login section.
Configuring Apache for Rainloop webmail
First of all, you need to establish access to your webmail via Apache. Since you already have a website, even Apache welcome screen will do, you can just configure an alias.
Run the following command
sudo nano /etc/apache2/mods-enabled/alias.confInside add the following
<IfModule alias_module>
        Alias /rainloop "/var/www/rainloop/"
        <Directory "/var/www/rainloop/data">
                Options -Indexes
                Deny from all
        </Directory>
</IfModule>
This will do two things
- Allow access to webmail via the following link $FQDN/rainloop/
- Disallow internet access to Rainloop’s data folder, which contains sensitive information such as server and admin account data, and is a potential security breach
CAUTION do not restart Apache just yet. I will prompt you to do that after the next step to avoid a security breach due to a full momentary access to your webmail folder!
Getting Rainloop
Now you have to create a folder for your service, run the following
sudo mkdir /var/www/rainloop
sudo chmod -R 777 /var/www/rainloop
cd /var/www/rainloop
Download Rainloop using the following command
wget https://www.rainloop.net/repository/webmail/rainloop-community-latest.zipNow unzip the archive and delete it afterwards with the following
unzip rainloop-community-latest.zip
rm rainloop-community-latest.zip
Now set proper permission to the folder
sudo chmod -R 750 /var/www/rainloop
sudo chown -R www-data:www-data /var/www/rainloop
Finally you can restart Apache server with the following
sudo service apache2 restartFirst time admin login
CAUTION if you encounter the following error – The following PHP extensions are not available in your PHP configuration! then check out this tutorial to see how to install missing PHP modules.
It is important to configure admin account and domain settings. Go to the following address
$FQDN/rainloop/?admin
Default login credentials are
- User – admin
- Password – 12345
After a successful login navigate to Security tab. You will see the following screen
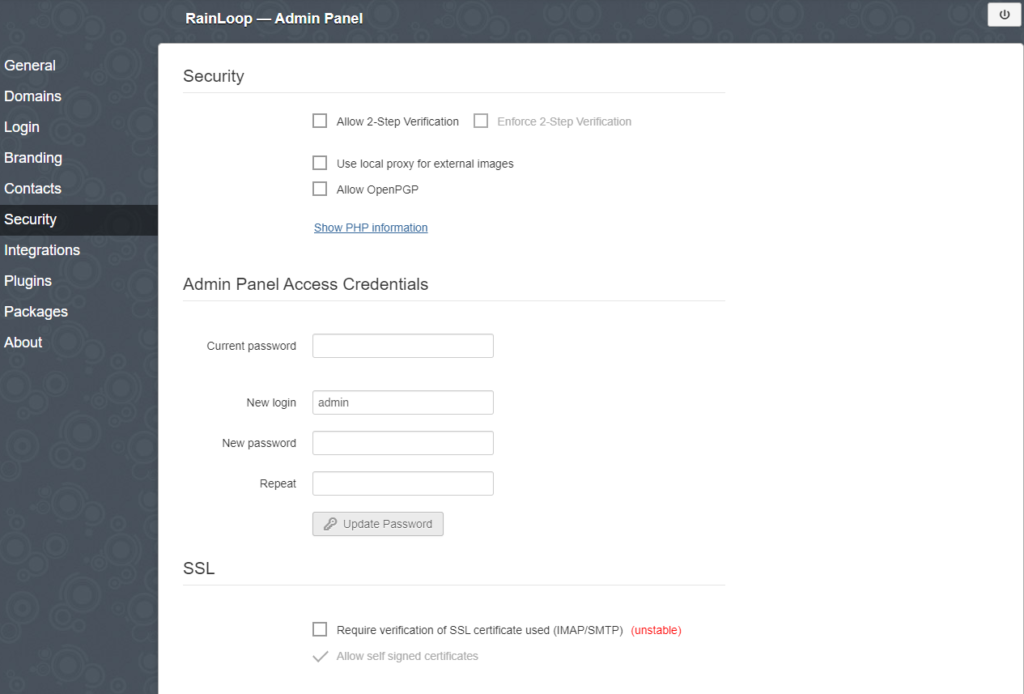
Change login and password by filling Admin Panel Access Credentials and clicking on Update Password box.
Adding your server
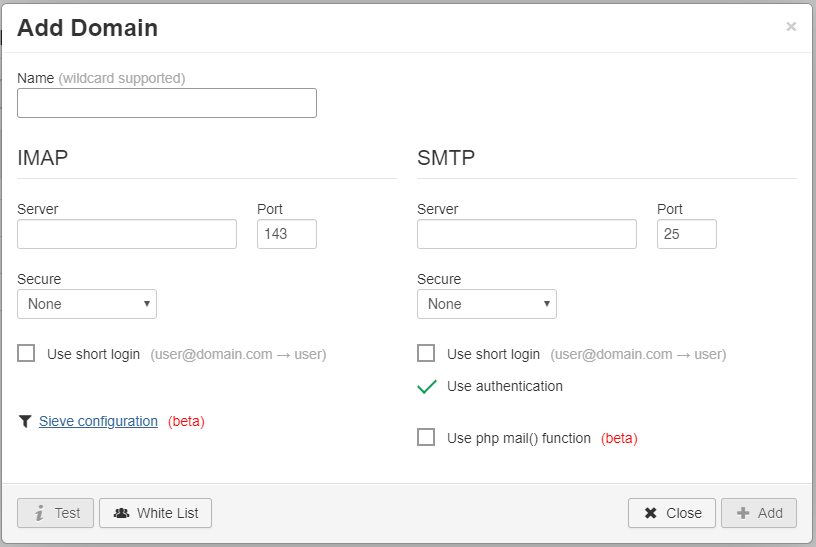
Go to Domains tab and click on + Add Domain at the top. You will see the following box
Now fill out fields like on the below screenshot, amending for your email server
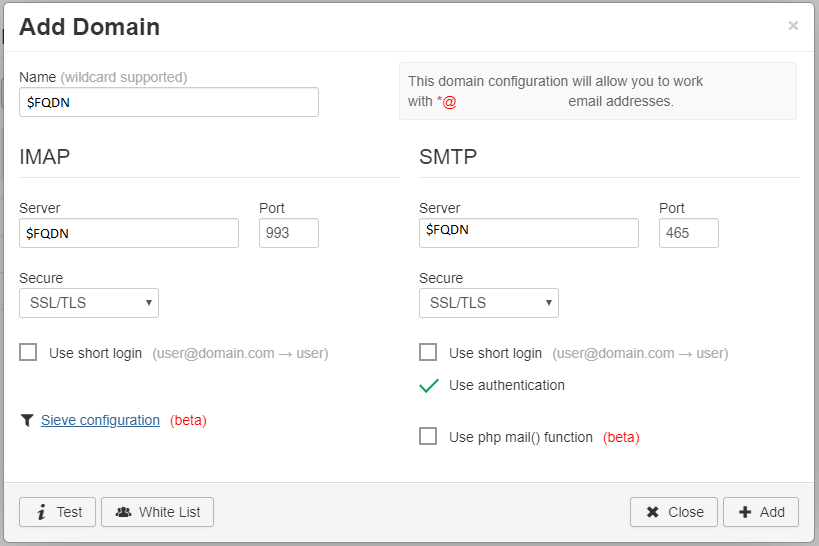
Substitute $FQDN with your email server address. Click on Test button in the lower left corner to see if everything is correct. IMAP and SMTP headings will turn green to confirm that configuration is ok.
You can tick Use short login box to allow users to log in without adding @FQDN to their credentials.
Now click on + Add button in the lower right corner.
Default domain
Finally, you need to configure the default domain. Navigate to Login tab and in the Default Domain field put your $FQDN.
First time user login
Now you can navigate to $FQDN/rainloop/ address to log in to your webmail.
Use system user credentials to access email of that particular user.
Additional settings
There are some additional settings that you can change if you would like to, such as
- Default language – General tab
- Page title – Branding tab
Contacts
You can also add address book for your users. In order to do so you have to create a new MySQL database. It is advised to create a user specifically for that database as well. Learn how to do that here.
While in Admin Panel navigate to Contacts tab. You will see the following
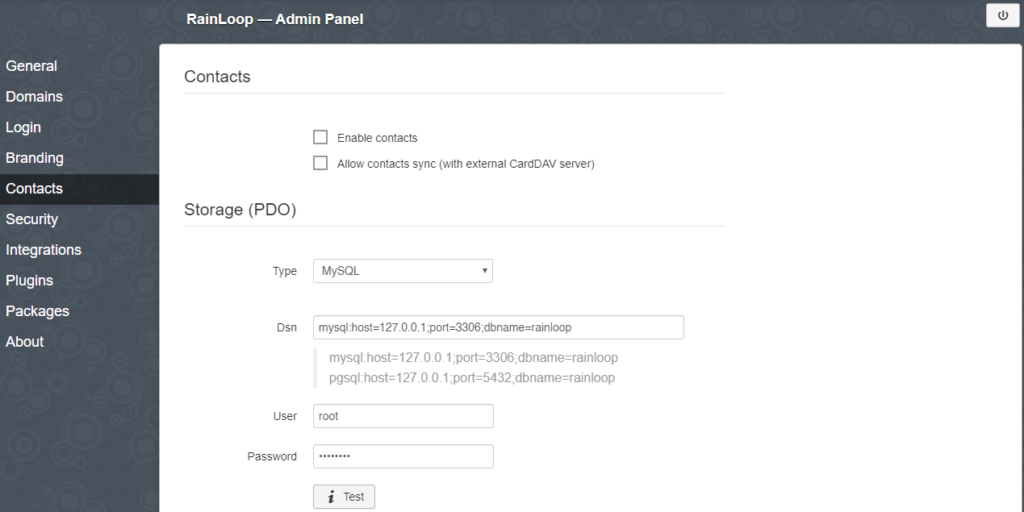
If you have a database and a user ready just put everything in, and tick the Enable contacts box at the top.
Conclusion
Adding webmail capability to your email server is very easy and quick. Additionally, using an alias with your domain allows usage of your certificate for encrypted connection. If you want, you can add some plugins to your webmail, however, making your webmail bulky is not a good idea. Having said that, I could not resist adding a snowfall plugin during winter…
A big shoutout to user castleontheroad from RPi forum who helped me with initial setup!